Studio Apartment Layout Ideas That Create Separate Zones
· SmallSpace AI Editorial
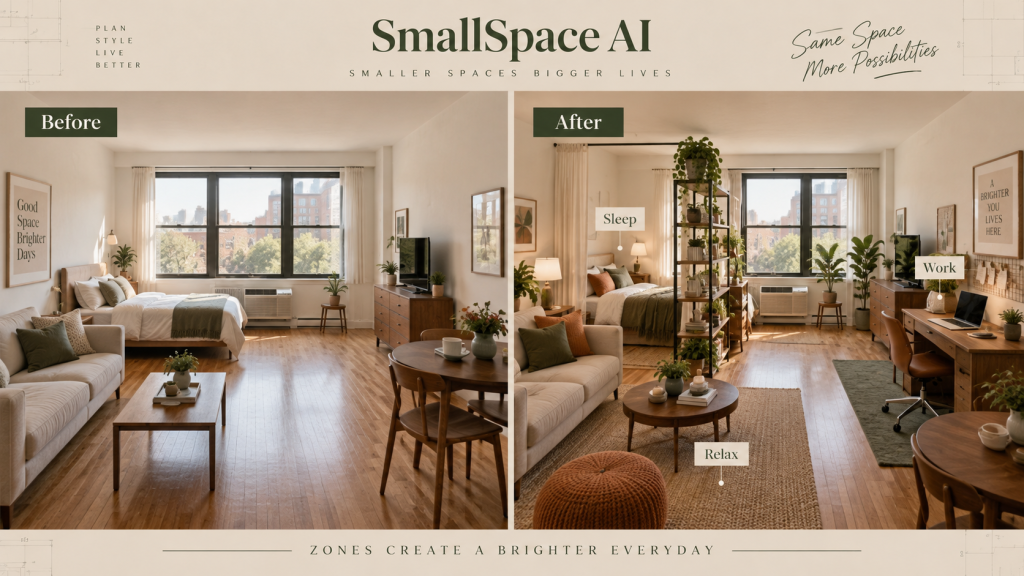
Quick answer
A studio apartment feels more separate when each activity gets a defined zone and one clear circulation route connects them. Start with the bed, then place the lounge, work or dining area, and storage around it. Use rugs, furniture orientation, lighting, and open shelving to create boundaries without building walls.
Who this is for
This guide is for renters in open-plan studios who need sleeping, relaxing, working, and eating functions to coexist without permanent construction.
Measure the fixed things first
- Overall room dimensions.
- Kitchen footprint and appliance clearances.
- Bathroom and entry door swings.
- Window locations and radiators.
- Bed, sofa, desk, and storage footprints.
Fixed elements decide the layout. Furniture is the flexible layer.
Plan the studio in this order
- Sleep zone: place the bed where it does not block the main route.
- Lounge zone: give the sofa or chair the next strongest wall or orientation.
- Work or dining zone: use the best remaining light and wall access.
- Storage zone: fit it into leftover edges without narrowing circulation.
Three practical studio layouts
| Layout | Best for | Divider | Main advantage |
|---|---|---|---|
| Corner bed + central lounge | Rectangular studios | Open shelf or rug | Clear sleep separation |
| Sofa-back divider | Open-plan studios | Sofa orientation | No extra furniture |
| One-wall sequence | Very narrow studios | Lighting + rugs | Preserves central walkway |
Layout 1: Put the bed in a corner and build outward
Place the bed at the quiet end of the studio, ideally away from the entry. Use a low or open bookshelf, a curtain, or a change in rug to mark the edge of the sleep zone. Keep the divider visually light so daylight can travel through the room.
Layout 2: Use the back of the sofa as the boundary
Float the sofa with its back toward the bed. The sofa becomes the line between sleeping and living without adding a screen. This works especially well when the TV or main view is on the opposite wall.
Do not float the sofa if it blocks the only route from the entry to the kitchen or window. Circulation beats symmetry.
Layout 3: Arrange functions along one wall
In a narrow studio, trying to create several side-by-side zones can destroy the walkway. Instead, line up bed, storage, desk, and lounge functions along the long walls and keep the center as the shared circulation lane.
Use rugs as boundaries, not decoration
A rug can define the lounge without adding height or blocking light. Keep the bed outside the lounge rug when possible so the zones read separately. In a very small studio, one rug under the seating group may be enough.
Use lighting to give each zone a job
Give the bed a warm bedside light, the desk a focused task light, and the lounge a softer ambient source. The difference in lighting helps each area feel intentional even when the furniture is only a few feet apart.
Open shelving versus solid dividers
Open shelving can separate zones while allowing light and sightlines through. A solid bookcase or tall screen may provide more privacy but can make a small studio feel darker. Choose the minimum amount of separation needed for the problem you are solving.
Protect one continuous walking route
Try to maintain a clear route from the front door to the kitchen, bathroom, and main window. A practical target is around 30 inches where possible, but the actual requirement depends on your room and accessibility needs. Avoid making every zone its own obstacle course.
Renter-friendly ways to create privacy
- Freestanding open bookshelf.
- Clothing rack with a curtain panel.
- Tension-rod curtain where the structure allows it.
- Folding screen.
- Tall plants grouped at a zone boundary.
- Strategic sofa orientation.
Common studio layout mistakes
- Placing the bed first without checking the entry-to-kitchen route.
- Using a tall opaque divider that blocks the only daylight.
- Buying furniture before measuring the full used footprint.
- Trying to create too many tiny zones.
- Using different colors and storage systems in every zone, which makes one room feel fragmented.
Studio layout checklist
- Map fixed elements.
- Place the bed.
- Draw the main circulation path.
- Place the lounge around that path.
- Add work or dining only where a chair can pull out.
- Use storage to reinforce zones, not block them.
- Add rugs and lighting last.
Choose the plan by studio shape
| Studio shape | Best zoning move | Avoid |
|---|---|---|
| Long and narrow | Arrange zones in sequence along the long walls | Crosswise furniture that chops the room into tight slices |
| Square | Use a floating sofa, rug, or open shelf to make boundaries | Pushing every piece to the perimeter and leaving a dead center |
| L-shaped | Give the smaller leg one dedicated job, usually sleep or work | Ignoring the nook and crowding everything into the main box |
| Micro studio | Prioritize sleep, one flexible living/work zone, and a clear route | Trying to create four fully furnished mini-rooms |
Give every zone a priority level
Not every renter needs four equally sized zones. Rank sleep, work, dining, and lounging from most to least important. Give the top two real floor space, let the third share furniture, and make the fourth flexible. A dining table can double as a desk; a sofa can define the living zone; a storage shelf can also act as the sleep-zone boundary.
Pressure-test the layout before buying a divider
Tape the bed, sofa, desk, and storage footprints onto the floor, then walk from the entry to the kitchen, bathroom, window, and bed. If the path fails before the divider is added, the divider is not the solution. Fix the furniture geometry first, then add the lightest boundary that gives enough privacy.
Next guides
If the living area needs a TV, see Small Living Room Layout With Sofa and TV. For small sleeping areas, compare our 8×10 bedroom layouts.
Leave a Reply